CRA 기반으로 Storybook 프로젝트 생성 및 Docker 설정

Written by
성기동
on

1. React 생성
npx create-react-app planet-fe --template typescript

yarn add typescript @types/node @types/react @types/react-dom @types/jest
2. 스토리북 환경 구축
npx -p @storybook/cli sb init
- babel-loader 문제로 인한 yarn start시 에러발생 해결방법
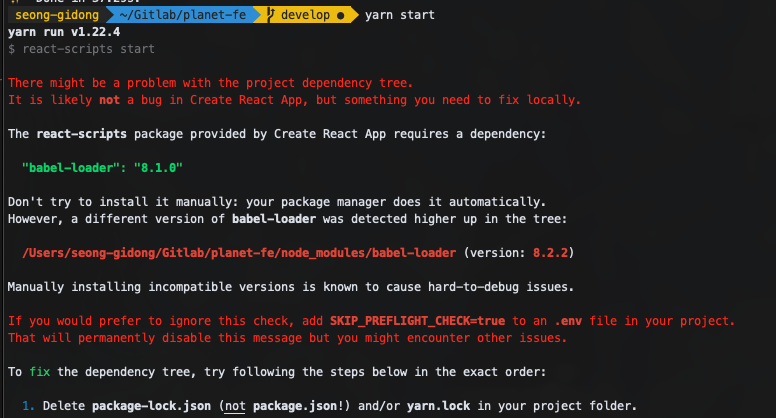
yarn start시에 babel-loader에서 종속성 문제가 발생할 수 있다.
typescript와 스토리북에서 모두 babel-loader를 사용하고 있어서 생기는 문제라고 되어있는것 같다.
이를 해결하기 위해서 우선, node_modules, yarn.lock(혹은 package-lock.json)을 삭제하고
package.json에 다음과 같은 부분을 추가후 다시 실행을 하면 정상 구동되는 부분을 확인할 수 있다.
"resolutions": {
  "babel-loader": "8.1.0"
},
여기까지만 하고 yarn storybook을 실행하면 정상적으로 Storybook의 화면을 확인할 수 있다.
그리고 아래부터는 Docker Base로 프로젝트를 셋팅하는 방법에 대해서 기술하고 있다.
3. Docker
Dockerfile 생성
Dockerfile
FROM node:14.15 as builder

# 작업 폴더를 만들고 npm 설치
RUN mkdir /usr/src/app
WORKDIR /usr/src/app
ENV PATH /usr/src/app/node_modules/.bin:$PATH
COPY package.json /usr/src/app/package.json
RUN yarn

# 소스를 작업폴더로 복사하고 빌드
COPY . /usr/src/app
RUN yarn build-storybook

FROM nginx:latest
# nginx의 기본 설정을 삭제하고 앱에서 설정한 파일을 복사
RUN rm -rf /etc/nginx/conf.d
COPY conf /etc/nginx

# 위에서 생성한 앱의 빌드산출물을 nginx의 샘플 앱이 사용하던 폴더로 이동
COPY --from=builder /usr/src/app/storybook-static /usr/share/nginx/html

# 80포트 오픈하고 nginx 실행
EXPOSE 80
CMD ["nginx", "-g", "daemon off;"]
- 이미지 생성
docker build -f Dockerfile.prod -t 도커ID/도커컨테이너 .
- 이미지 실행
docker run -it -p 80:80 도커ID/도커컨테이너
- Docker Push
docker push 도커ID/도커컨테이너
Docker Compose 생성
docker-compose.yml
version: "3"

services:
  sample:
    container_name: react-storybook
    image: "도커ID/도커컨테이너:latest"
    build:
      context: .
      dockerfile: Dockerfile
    ports:
      - "80:80"
- Docker Compose를 활용해 Docker 이미지를 생성하고 컨테이너 실행
docker-compose up -d --build
- Docker Compose 정지
docker-compose stop
4. Ubuntu에서의 설정
- 우분투는 apt 패키지 관리자를 사용, 먼저 패키지 목록 업데이트
$ sudo apt update -y
- 도커CE는 몇가지 패키지에 의존하므로, 아래 4가지 패키지를 설치한다
$ sudo apt install -y apt-transport-https ca-certificates curl software-properties-common
- 도커 패키지 저장소를 apt에 등록한다.
$ curl -fsSL https://download.docker.com/linux/ubuntu/gpg | sudo apt-key add -
$ sudo add-apt-repository "deb [arch=amd64] https://download.docker.com/linux/ubuntu bionic stable"
- 다시 한 번 apt 패키지 목록을 업데이트
$ sudo apt update -y
- 도커CE를 설치한다
$ sudo apt install -y docker-ce
- 도커를 시작한다
$ sudo systemctl start docker
- 도커 상태 확인
$ sudo systemctl status docker
- 도커 버전 확인
$ docker version